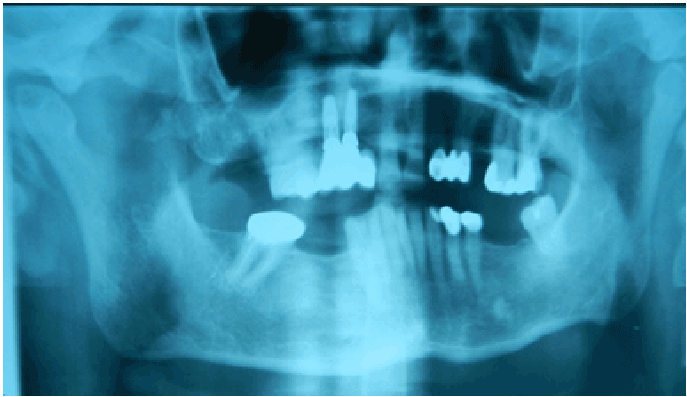
Figure 1: Orthopantamogram radiograph shows hopeless upper left second molar with failed endodontic treatment (white arrow), already extracted upper right second molar (orange arrow)

Mohammed Jasim AL-Juboori*
Lecturer in the Department of Oral Surgery, MAHSA University, Malaysia*Corresponding author: Dr. Mohammed Jasim Al-Juboori, Lecturer in the Department of Oral Surgery, MAHSA University, Malaysia, Tel: +60)0162417557; Fax: +60320909998; E-mail: doctor_mohamed_2006@yahoo.com
Socket healing after tooth extraction is associated with bone density and maturation, which may affect the stability of primary dental implants. This report describes a case of upper left and right second molar extraction, followed by implant placement at 2 and 3 months in the same patient. Implant stability was examined using resonance frequency analysis (RFA). Primary implant stability in the healing socketvaried significantly between the two time points (2 and 3 months). For the 2-month healing period, the mesiodistal implant stability quotient (ISQ) was 43, and the buccolingual ISQ was 37. For the 3-month healing period,the mesiodistal ISQ was 73, and the buccolingual ISQ was 70. An implant with high primary stability was immediately loaded with progressive loading and a follow-up period of 3 months. The progressively loaded implant was associated with increased implant stability compared with the delay loaded implant after the 3-month healing period. This case demonstrates 2 options for the operator after tooth extraction: progressive immediate implant loading or delay loading. However, both techniques depend on the stability of the primary implant. Progressive loading is a dependable procedure for an immediately loaded implant that is placed in soft bone. Using composite and temporary abutment is applicable and convenient for temporization during healing period.
Socket healing; Implant stability; Progressive loading; Bone density; Delay loading
A significant loss of tissue contour occurs during the first month after tooth extraction, which may range from 3-5 mm in width after 6 months [1,2]. Studies have recommended an 8-week period between tooth extraction and implant placement to allow the socket to heal. Therefore, the implant may be placed into a more favorable volume and quality of bone [3].
In studies of bone healing after tooth extraction that evaluated bone density over time, woven bone was observed in the 2nd week of socket healing. Lamellar bone (mature, dense bone) formation was completed after 6 months of healing. According to Lechom and Zarb [4], the bone density classification for the posterior maxilla is D4 or less dense bone (thin cortical bone with scarce trabecular bone). Poor bone density generally does not support implants during the healing and loading stages [5-7]. Higher failure rates were found in patients with areas of poor bone quality or where unfavorable bone quality was expected (the posterior segment of the maxilla) [8,9].
Special care should be taken when implants are placed in the posterior maxillary area, such as undersized bone preparation to obtain primary stability, implant surface modifications (roughened surface), implants with a wide diameter, an aggressive implant design, the submerged technique and a long healing period. All of these measures increase the implant surface area, which increases the bone-implant contact (BIC) and implant stability [6,10,11]. The progressive implant loading technique was invented by Misch12 for implants that are placed in poor bone density. This technique allows the bone to mature during the loading period without overloading the implant, which may lead to bone loss and implant failures [13]. A study by Ban et al. [14] compared 2 groups of patients who underwent progressive immediate loading with a group of patients who underwent delay loading. A significant increase in the boneimplant contact (BIC) and a decrease in vertical bone loss were observed in the progressive loading group. Our case report has two parts. The first part demonstrates the bone density differences during different healing periods. The second part discusses the new technique of immediate progressive implant loading.
The patient was a 62-year-old man with no history of any systemic disease or parafunctional occlusion. The patient attended our facility for the extraction of his upper right second molar and an implant placement. The extraction was performed in a non-traumatic procedure. The tooth was separated, and the 3 roots were removed. The patient was advised to wait 8 weeks for the tooth to completely heal before the extracted tooth would be replaced with an implant. After one month, the same patient was referred from the endodontic department for the extraction of his upper left second molar due to root and bifurcation perforation during endodontic preparation. The extraction was performed in a non-traumatic procedure, and the patient was advised to wait 8 weeks for the tooth to completely heal before implant placement. In a discussion with the patient, a decision was made to place both the right and left implants during the same appointment. Therefore, an implant was placed in the left side after a 2 month healing period, whereas an implant was placed in the right side after a 3 month healing period. An orthopantomogram (panorex) was taken (Figure 1). After clinical and radiographic examinations, a 4.5 mm tapered implant, 10 mm in length, was selected for placement. Under local anesthesia, a crestal incision was made without vertical extension, and the bone was exposed and prepared according to the manufacturer’s recommendations. The bone density was poor; therefore, the last drill was drilled half way. The implant design was tapered, and the surface was modified (sandblasted, large-grit, and acid-etched, SLA) and threaded until the top (Superline, Dentium) to achieve better implant stability and to increase the implant surface area. The implants were placed subcrestally at approximately 1 mm. RFA measurements were obtained for both implants (Figure 2). For the left implant, the mesiodistal ISQ was 43, and the buccolingual ISQ was 37and for right implant mesiodistal 73 ISQ, bucco-lingual 70 ISQ. Cover screw was placed with the left implant and was covered with gingival tissue and primary closed using the submerged technique. The right implant was immediately loaded using a temporary plastic abutment, and the crown was fabricated from light-cured composite material (Figure 3). At this stage, the crown was out of occlusion with a narrow occlusal table and no adjacent contact (Figure 4). The flap was adapted to the temporary crown, and the gingival tissue was sutured around it (Figure 5). Periapical radiographs were postoperatively taken for both implants and were considered basic radiographs. Postoperative instructions were given to the patient. After 10 days, the patient returned for suture removal and examination. Both implant sites healed uneventfully, and suture removal was performed (Figure 6). One month after implant placement, the temporary abutment and crown were unscrewed. RFA measurements were obtained. The mesiodistal ISQ was 76, and the buccolingual ISQ was 75. The crown was modified by increasing the width of the occlusal table, and the crown was in mesial contact with an adjacent tooth (upper right first molar). At this stage, the crown was out of occlusion (no increase in crown height) (Figure 7). The crown was polished and screwed again into the fixture. Two months after implant placement, the patient returned again for the third stage of crown modification. The temporary abutment and crown were unscrewed. RFA measurements were obtained. The mesiodistal ISQ was 80, and the buccolingual ISQ was 77. The crown was modified by increasing its height, and the crown was in occlusal contact with an agonist only in the axial direction. Occlusal contact during excursion movement was removed, and only central contact remained (Figure 8). Three months after implant placement, the temporary abutment and crown were unscrewed. RFA measurements were obtained. Themesiodistal ISQ was 80, and the buccolingual ISQ was 80. The left implant was uncovered, and RFA measurements were obtained. For the left implant, the mesiodistal ISQ was 72, and the buccolingual ISQ was 63. A healing abutment was placed and left in for one month for soft tissue maturation (Figure 9). Four months after implant placement, impressions were taken. The closed tray impression technique with hex impression coping was performed. Bite registration was conducted using a wax bit rim, and the jaw relationship was measured using O-bite. A laboratory created a titanium hex straight abutment and an acrylic provisional crown (Figure 10). The abutments were screwed in and tightened to 30 Ncm for both implants, and the provisional crowns were cemented using temporary cementation. Occlusion was assessed and adjusted. Only centric occlusion was allowed, and all contact during excursion movement was removed (Figure 11). A definite crown will be issued 6 months after the provisional crown was placed. Periapical radiographs were obtained for both implants and were considered basic prosthetic radiographs for further follow-up after implant loading (Figure 12).
Figure 1: Orthopantamogram radiograph shows hopeless upper left second molar with failed endodontic treatment (white arrow), already extracted upper right second molar (orange arrow)
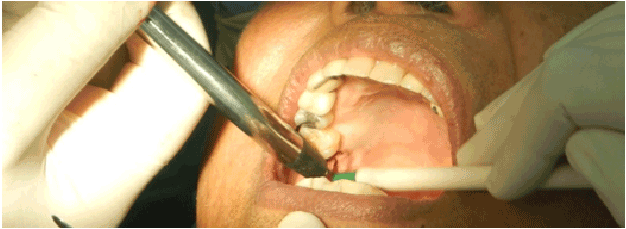
Figure 2: RFA measurement at the day of implant placement (basic reading), for both left and right implant. This measurement repeated monthly for the progressively loaded implant (right implant)
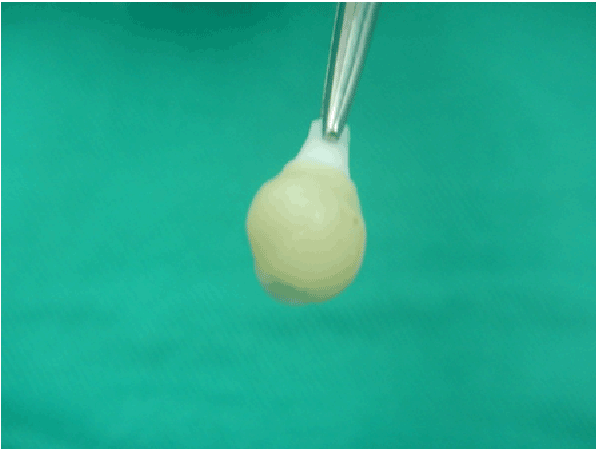
Figure 3: Temporary abutment with crown fabrication from composite filling for easy adjustment and modification. Fabricated, contoured and polished outside patient mouth.
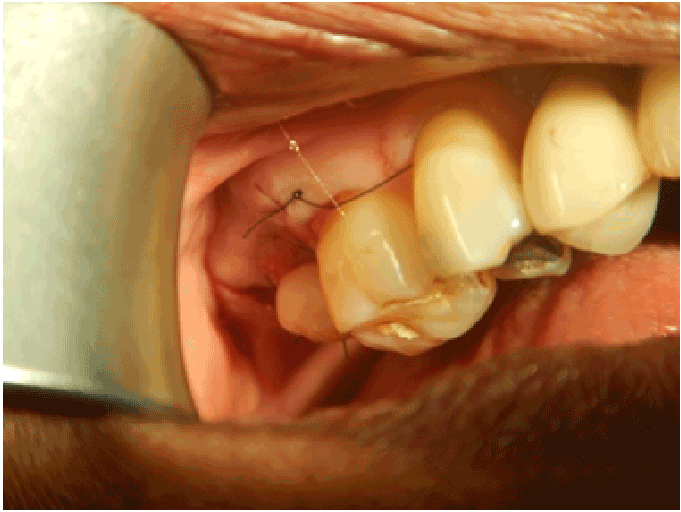
Figure 4: Buccal view of the temporary abutment and crown issued at the day of surgery (implant placement), flap adapted and sutured with nylon sutures
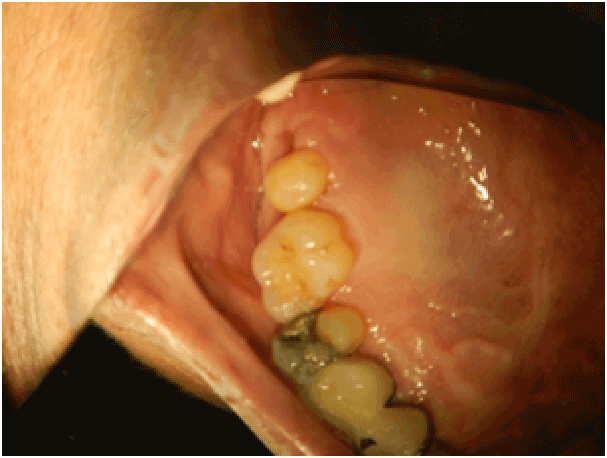
Figure 5: Palatal view of the temporary abutment and crown issued at the day of surgery (implant placement), flap adapted and sutured with nylon sutures.
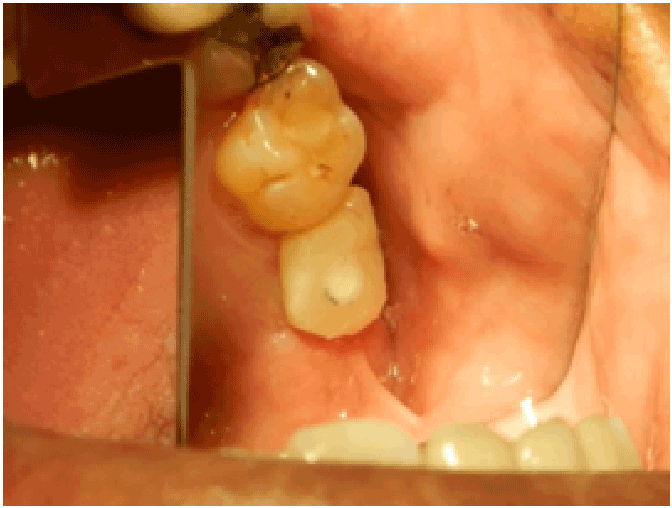
Figure 6: Occlusal view of the installed temporary crown at the day of suture removal after 10 days. Still the soft tissue row and immature
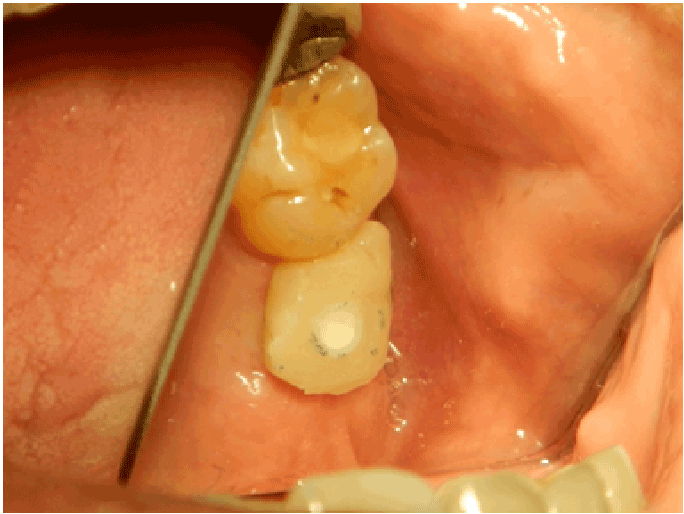
Figure 7: Second stage of crown modification after one month. Notice the occlusal table increased and mesial contact area created with distal of the first molar. Still the crown is out of occlusion at this stage
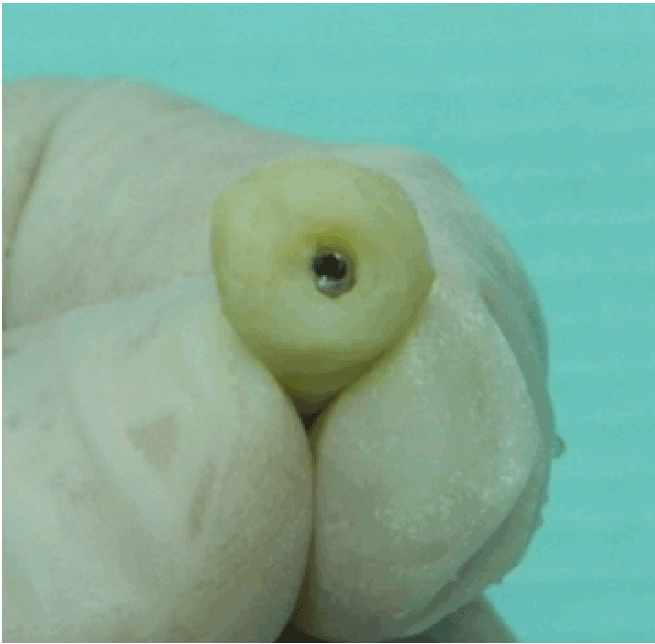
Figure 8: Third stage of crown modification after two month. Notice the increased in the height of the temporary crown. The crown is now with occlusal contact of agonist tooth at this stage (only axial occlusion is allowed)
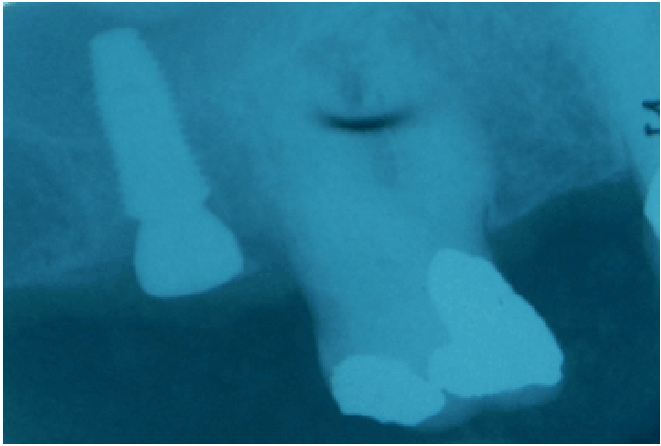
Figure 9: Exposure of the left submerged implant after three months healing period. RFA was measured and healing abutment was placed for one month before impression taken
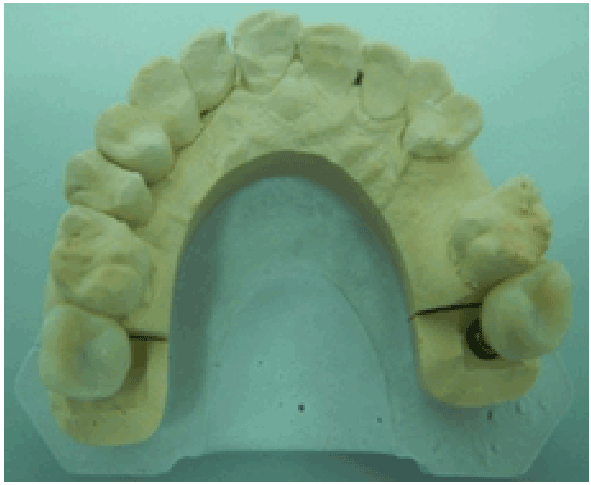
Figure 10: Laboratory work deliver, using acrylic material as a provisional crown for both implants
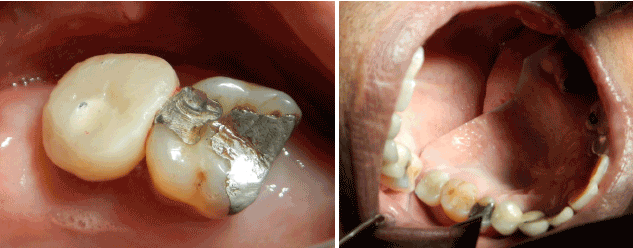
Figure 11: Permanent abutment with provisional crown issued for the left and right implant, after 6 months the provisional crown will be replaced by definite crown. Figure 11: Permanent abutment with provisional crown issued for the left and right implant, after 6 months the provisional crown will be replaced by definite crown.
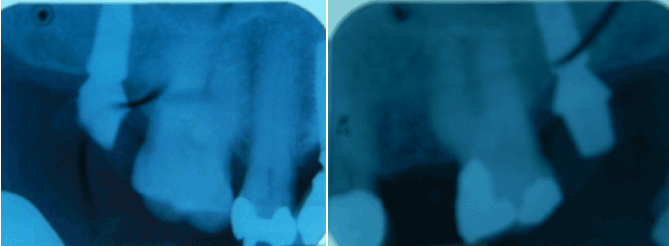
Figure 12: Periapical radiograph taken after permanent abutment and provisional crown issued. We can observe stable crestal bone level around the immediate loaded implant (left picture).
This case report is divided into 2 parts, the first part demonstrates the increases in bone density over time after tooth extraction, and significant differences were observed in the stability of the primary implants. The implant that was placed 3 months after tooth extraction was associated with higher RFA measurements (a mesiodistal ISQ of 73 and a buccolingual ISQ of 70) compared with the implant that was placed 2 months after tooth extraction (a mesiodistal ISQ of 43 and a buccolingual ISQ of 37). Many factors may play a role in the stability of primary implants, such as bone density, implant length, implant design, implant diameter, and osteotomy preparation [6,10,11]. The implant design, implant diameter, implant length and osteotomy preparation were similar for both implants in this patient, which were placed by the same operator. However, only bone density varied between the 2 and 3 month healing periods. In a previous study, more mature bone morphology was detected in sockets after a 12 week healing period compared with a 6 week healing period [15].
To achieve better primary implant stability, 3 months is the optimal healing period, especially when immediate loading is used. The second part of this case report will discuss the progressive implant loading technique that has been modified by the author. Progressive implant loading was invented by Misch12 and is recommended for implants that are placed in soft bone or grafted sites. After the osseointegration period, the implant is exposed and progressively loaded to prevent overloading, which increases bone density. Our technique is recommended for implants that are placed in soft bone but immediately loaded. Implant loading within physiological limits can enhance bone formation and increase bone density. This case report demonstrated how progressive loading with staged increases in the crown width, the occlusal table and the crown height can increase implant stability, especially during the first 4 weeks. Many studies have found a decrease in implant stability in the first 4 weeks of healing due to active bone remodeling and new bone formation [16-18]. In a comparison of the immediate progressive loaded implant and the submerged implant on the contralateral side, the RFA revealed higher ISQ readings for the loaded implant (80 ISQ) compared with the submerged implant (a mesiodistal ISQ of 72 and a buccolingual ISQ of 63) after the 3 month healing period. This evidence suggests that progressive loaded implants can stimulate bone formation and increase bone density in contrast to implants that are placed using conventional techniques, which completely isolate the implants from any type of loading. Ban et al. [14] reported that progressive implant loading speed up the mineralization process during a 28 day healing period. Placing an implant into soft bone with immediate loading is considered a risky procedure [10] because soft bone may not support the implant; therefore, measures of protection should be taken [5,6,13,19,20].
Measures of protection can achieve primary implant stability [10], such as selecting an implant with a wider diameter to increase the surface area of the implant and to increase the BIC [6,11]. An aggressive implant design, such as deep threading and threading the implant until the top, engage the implant with more bone during placement and increase the surface area [21]. Special consideration for the socket preparation when the last drill drilled half way or sometimes skip the last drill, this make the implant placed in undersized socket [6,10]. A tapered implant design enables the coronal part of the implant to engage the crestal cortical part of the alveolar bone. Subcrestal implant placement at approximately 1 mm protects the implant and provides more cortical bone engagement [22,23].
Another factor that affects the stability of the implant is the implanttreated surface. Many studies have indicated that SLA surface implants can enhance bone formation and chemotaxis of osteogenic cells [24]. For dental implants that are placed in soft bone, the SLA surface may enhance the quality and density of bone that is close to the implant [25,26]. All of these factors should be considered when placing implants into soft bone using immediate loading. The concept of this technique is based on natural tooth eruption. During eruption, root formation in the tooth has not yet completed. When the erupted tooth comes into occlusion with an agonist, only ¾ of the root has been formed [27]. In this technique, we direct the implant to erupt into the oral cavity by progressively increasing the crown width and height. This process, we call it as “Implant Eruption,” will allow the bone to grow and mature with loading stimulation that can achieve implant stability and increase bone density.
Bone density dramatically increased after tooth extraction from 2 to 3 months intervals. Progressive implant loading is a predictable procedure for immediately loaded implant that placed into the soft bone. Form this case seems immediate loading is more predictable with 3 month healing period after tooth extraction in soft bone area. Using composite and temporary abutment is applicable and convenient for temporization during healing period.
Download Provisional PDF Here
Aritcle Type: Case Report
Citation: AL-Juboori MJ (2015) Bone Density and Maturation after Tooth Extraction in the Upper Maxillary Molar Area and a New Technique of an Immediately Loaded Implant in Soft Bone: A Case Report. Int J Dent Oral Health 1(6): doi http://dx.doi. org/10.16966/2378-7090.150
Copyright: © 2015 AL-Juboori MJ. This is an open-access article distributed under the terms of the Creative Commons Attribution License, which permits unrestricted use, distribution, and reproduction in any medium, provided the original author and source are credited.
Publication history:
All Sci Forschen Journals are Open Access